Difference between revisions of "Cv4/stage3"
From Castlevania Speedrunning
Bogaabogaa (talk | contribs) (→Safe Route) |
(→Boss) |
||
| (11 intermediate revisions by 2 users not shown) | |||
| Line 10: | Line 10: | ||
== Safe Route == | == Safe Route == | ||
| − | |||
{{#ev:youtube|wnJK-o2HDYE|560}} | {{#ev:youtube|wnJK-o2HDYE|560}} | ||
==Optimal Route== | ==Optimal Route== | ||
| − | {{#ev:youtube| | + | {{#ev:youtube|IXMls7n9WlY|560}} |
'''Notes:''' | '''Notes:''' | ||
*This stage uses the [[Cv4/tricks#Ring_Glitch.2FTrick|Ring Glitch]] | *This stage uses the [[Cv4/tricks#Ring_Glitch.2FTrick|Ring Glitch]] | ||
*Section 3-1 is known to be heavy on RNG due to the Mudmen patterns, you will have to adjust your strategies here depending on pattern and how much damage you've taken. | *Section 3-1 is known to be heavy on RNG due to the Mudmen patterns, you will have to adjust your strategies here depending on pattern and how much damage you've taken. | ||
| − | *At 0: | + | *At 0:56 you can opt out of the fuzzball strat by just waiting to damage boost into it. |
| − | *At 2: | + | *At 2:18 you can opt out of the ring strat but is 17 frames slower [https://www.youtube.com/watch?v=7tL0eFJCaK0 Compare Video] |
| + | |||
| + | |||
| + | <div class="toccolours mw-collapsible mw-collapsed" style="width:560px"> | ||
| + | '''3-3 Skeleton Patterns''' | ||
| + | <div class="mw-collapsible-content">{{#ev:youtube|Kql-vxNqgtQ|560||}} | ||
| + | |||
| + | |||
| + | *There is a possible bad pattern that will always kill you: https://clips.twitch.tv/PerfectArbitraryJellyfishBibleThump?tt_medium=clips_api&tt_content=url | ||
| + | |||
| + | *Here is a alternative for that pattern: https://clips.twitch.tv/TangentialGloriousKuduMcaT?tt_medium=clips_api&tt_content=url | ||
| + | </div> | ||
| + | </div> | ||
| + | |||
| − | |||
=== 3-1 Mudmen RNG === | === 3-1 Mudmen RNG === | ||
| Line 30: | Line 41: | ||
* Whip down at the Mudmen a later than usual. This will ensure that even with the worst pattern (where the Mudmen hugs the corner), Simon will not take damage. | * Whip down at the Mudmen a later than usual. This will ensure that even with the worst pattern (where the Mudmen hugs the corner), Simon will not take damage. | ||
| − | === 3-2 | + | === 3-2 Fireball Boost === |
[[File:Stage 3-2 Fireball Boost Setup.jpg]] | [[File:Stage 3-2 Fireball Boost Setup.jpg]] | ||
| − | |||
| − | + | == Alternative Strats == | |
| − | |||
| − | |||
<div class="toccolours mw-collapsible mw-collapsed" style="width:560px"> | <div class="toccolours mw-collapsible mw-collapsed" style="width:560px"> | ||
'''3-3 Fast Bone Dragon Kill''' | '''3-3 Fast Bone Dragon Kill''' | ||
| − | <div class="mw-collapsible-content">{{#evt: service=twitchvod|id=394726912|dimensions=560|urlargs=autoplay=false}} | + | <div class="mw-collapsible-content">{{#evt: service=twitchvod|id=394726912|dimensions=560|urlargs=autoplay=false&parent=castlevaniaspeedruns.com}} |
'''Note:''' | '''Note:''' | ||
* Very hard strat to nail. Executing a [[Cv4/tricks#Simultaneous_Whip_and_Subweapon | whip cross ]] is a one frame trick and on top you do whip cancel to be able to jump faster. | * Very hard strat to nail. Executing a [[Cv4/tricks#Simultaneous_Whip_and_Subweapon | whip cross ]] is a one frame trick and on top you do whip cancel to be able to jump faster. | ||
</div> | </div> | ||
</div> | </div> | ||
| − | + | ||
| − | |||
| − | |||
| − | |||
| − | |||
| − | |||
| − | |||
| − | |||
| − | |||
| − | |||
| − | |||
| − | |||
<div class="toccolours mw-collapsible mw-collapsed" style="width:560px"> | <div class="toccolours mw-collapsible mw-collapsed" style="width:560px"> | ||
'''3-3 2nd Eyeball Damage Boost''' | '''3-3 2nd Eyeball Damage Boost''' | ||
<div class="mw-collapsible-content">{{#ev:youtube|zqeQtny61TA|560||}} | <div class="mw-collapsible-content">{{#ev:youtube|zqeQtny61TA|560||}} | ||
| + | <br/> | ||
| + | '''Alternative set-up''' | ||
| + | {{#ev:youtube|ngxVaK5cCQg|560||}} | ||
</div> | </div> | ||
</div> | </div> | ||
| − | + | ||
| + | |||
<div class="toccolours mw-collapsible mw-collapsed" style="width:560px"> | <div class="toccolours mw-collapsible mw-collapsed" style="width:560px"> | ||
| − | '''3- | + | '''3-1 Mudman Pattern Option''' |
| − | <div class="mw-collapsible-content">{{#ev:youtube| | + | <div class="mw-collapsible-content">{{#ev:youtube|lDu7z5Wob2M|560||}} |
| + | <br/> | ||
</div> | </div> | ||
</div> | </div> | ||
| − | |||
| − | |||
| − | |||
| − | |||
| − | |||
| − | |||
| − | |||
| − | |||
| − | |||
| + | == Boss: Orphic Vipers == | ||
| + | ===Safe Strat=== | ||
| + | {{#ev:youtube|r89HLCBoxgw|560||}} | ||
'''Notes:''' | '''Notes:''' | ||
| − | * | + | * A safe way to handle the 3-3 boss. |
| + | === Optimal === | ||
| − | == | + | <div class="toccolours mw-collapsible mw-collapsed" style="width:560px"> |
| − | + | '''Alternative Viper Kill Strat''' | |
| − | + | <div class="mw-collapsible-content">{{#ev:youtube|ZDbJ6oG01E8|560||}} | |
| − | + | </div> | |
| − | ''' | + | </div> |
| − | |||
| − | |||
| − | |||
| − | |||
| − | |||
| − | {{#ev:youtube| | ||
| − | |||
| − | |||
| − | |||
| − | |||
| − | |||
| − | |||
| − | |||
Latest revision as of 04:31, 24 May 2023
 | |
| Game | Super Castlevania IV |
|---|---|
| Level sections | 3-1, 3-2, 3-3 |
| Level name | Cave/Submerged City |
| Previous level | Stage 2 |
| Next level | Stage 4 |
Contents
Safe Route
Optimal Route
Notes:
- This stage uses the Ring Glitch
- Section 3-1 is known to be heavy on RNG due to the Mudmen patterns, you will have to adjust your strategies here depending on pattern and how much damage you've taken.
- At 0:56 you can opt out of the fuzzball strat by just waiting to damage boost into it.
- At 2:18 you can opt out of the ring strat but is 17 frames slower Compare Video
3-3 Skeleton Patterns
- There is a possible bad pattern that will always kill you: https://clips.twitch.tv/PerfectArbitraryJellyfishBibleThump?tt_medium=clips_api&tt_content=url
- Here is a alternative for that pattern: https://clips.twitch.tv/TangentialGloriousKuduMcaT?tt_medium=clips_api&tt_content=url
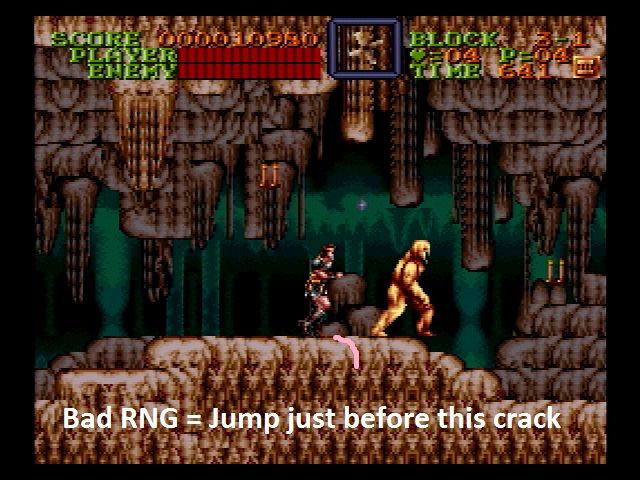
3-1 Mudmen RNG
Notes:
- Whip down at the Mudmen a later than usual. This will ensure that even with the worst pattern (where the Mudmen hugs the corner), Simon will not take damage.
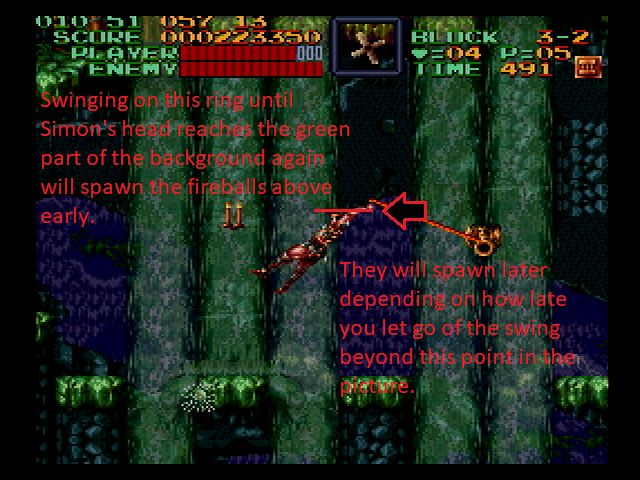
3-2 Fireball Boost
Alternative Strats
3-3 Fast Bone Dragon Kill
Note:
- Very hard strat to nail. Executing a whip cross is a one frame trick and on top you do whip cancel to be able to jump faster.
3-3 2nd Eyeball Damage Boost
Alternative set-up
3-1 Mudman Pattern Option
Boss: Orphic Vipers
Safe Strat
Notes:
- A safe way to handle the 3-3 boss.
Optimal
Alternative Viper Kill Strat

