Difference between revisions of "Cv4/stage1"
From Castlevania Speedrunning
m (YT link doesnt work anymore) |
m (YT link doesnt work anymore) |
||
| Line 82: | Line 82: | ||
*Please see Joe's [[Cv4/tutorials#JoeDamillio.27s_.28Most.29_Bosses_Tutorial | boss tutorial]] as well for more detailed information. | *Please see Joe's [[Cv4/tutorials#JoeDamillio.27s_.28Most.29_Bosses_Tutorial | boss tutorial]] as well for more detailed information. | ||
| − | |||
| − | |||
| − | |||
| − | |||
| − | |||
| − | |||
</div> | </div> | ||
</div> | </div> | ||
Revision as of 03:20, 19 May 2023
 | |
| Game | Super Castlevania IV |
|---|---|
| Level sections | 1-1, 1-2, 1-3 |
| Level name | Horse Stables |
| Previous level | None |
| Next level | Stage 2 |
Safe Route
Notes
- This route is intended for beginners and avoids most damage boosts to get through the stage.
Optimal Route
Notes
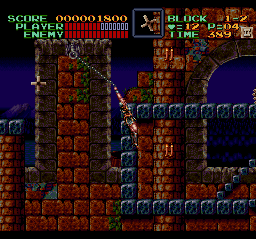
- At 1:10 performs the wall clip (saves ~2.5). A tutorial can be found below.
- At 1:20 this skeleton is random. If he does not jump you will take a secondary boost in the next screen.
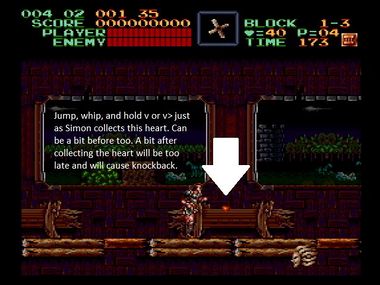
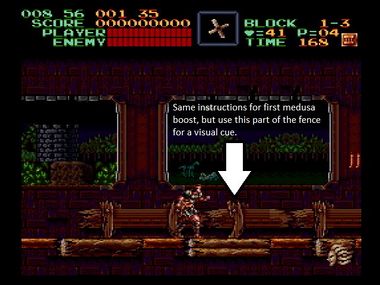
- At 2:00 performs a medusa boost with a limp whip, (each saves ~.25) see visual cues below for more information.
- At 2:20 for more information on the boss fight see below section.
1-2 Wall Clip Tutorials
Notes:
- This trick saves ~2.5 over normal strat and the inputs are precise to getting into the wall successfully.
- When connecting to the ring the screen needs to scroll left so the game will try to eject you to the right side of the wall.
- These are the 4 pixels where Simon can jump into the screen transition. See visuals below.
- For other tutorials on wall clip see link here.
Frame to let go
Pixels To Jump Into Transition
1-3 Medusa Boosts
Boss: Rowdain
Safe
Notes
- Whipping 4 times helps set up the timing so the first cross hits the horse head as it appears.
Optimal
Notes
- You lose no time on clunk frames when you enter the boss as the transition is scripted.
- Jump 3 times before the fight starts as a cue for when to throw your crosses.
- Please see Joe's boss tutorial as well for more detailed information.
</div> </div>


