Difference between revisions of "Cv4/stage1"
From Castlevania Speedrunning
m |
|||
| (94 intermediate revisions by 6 users not shown) | |||
| Line 5: | Line 5: | ||
| level_sections = 1-1, 1-2, 1-3 | | level_sections = 1-1, 1-2, 1-3 | ||
| previous = None | | previous = None | ||
| − | | next = [[Stage 2]] | + | | next = [[cv4/stage2 | Stage 2]] |
}} | }} | ||
| − | |||
| − | |||
| − | + | == Safe Route == | |
| − | + | {{#ev:youtube|VfbSwfDC8YI|560}} | |
| − | {{#ev:youtube| | ||
| − | |||
| − | |||
| − | |||
| − | |||
| − | + | '''Notes'''<br/> | |
| + | *This route is intended for beginners and avoids most [[Cv4/tricks#Damage_Boosting | damage boosts]] to get through the stage. | ||
| − | + | == Optimal Route == | |
| − | {{#ev:youtube| | + | |
| − | + | {{#ev:youtube|FGP_9VUP6Go|560}} | |
| − | 1 | + | |
| − | + | '''Notes''' <br/> | |
| − | Notes: | + | *At 1:10 performs the wall clip (saves ~2.5). A tutorial can be found below.<br/> |
| − | *2 | + | *At 1:20 this skeleton is random. If he does not jump you will take a secondary boost in the next screen. |
| − | + | *At 2:00 performs a medusa boost with a [[Cv4/tricks#Limp_Whip | limp whip]], (each saves ~.25) see visual cues below for more information. | |
| − | + | *At 2:20 for more information on the boss fight see below section. | |
| − | + | ||
| − | Notes: | + | |
| − | * | + | <div class="toccolours mw-collapsible mw-collapsed" style="width:770px"> |
| − | + | '''1-2 Wall Clip Tutorials''' | |
| − | + | <div class="mw-collapsible-content">{{#evt: service=twitchvod|id=394702574|dimensions=560|urlargs=autoplay=false&parent=castlevaniaspeedruns.com}}<br/><br/> | |
| + | '''Notes:'''<br/> | ||
| + | *This trick saves ~2.5 over normal strat and the inputs are precise to getting into the wall successfully. | ||
| + | *When connecting to the ring the screen needs to scroll left so the game will try to eject you to the right side of the wall. | ||
| + | *These are the 4 pixels where Simon can jump into the screen transition. See visuals below. | ||
| + | *For other tutorials on wall clip see link here. | ||
| + | <br/> | ||
| + | |||
| + | ''' Frame to let go ''' | ||
| + | |||
| + | [[File:WallClipFrame_to_let_go.png | 320px]] | ||
| + | |||
| + | |||
| + | ''' Pixels To Jump Into Transition ''' | ||
| + | |||
| + | [[File:WallClipTPpixel1.jpg | 320px]] | ||
| + | [[File:WallClipTPpixel2.jpg | 320px]] | ||
| + | [[File:WallClipTPpixel3.jpg | 320px]] | ||
| + | [[File:WallClipTPpixel4.jpg | 320px]] | ||
| + | </div> | ||
| + | </div> | ||
| + | |||
| + | |||
| + | <div class="toccolours mw-collapsible mw-collapsed" style="width:770px"> | ||
| + | '''1-3 Medusa Boosts''' | ||
| + | <div class="mw-collapsible-content">{{#ev:youtube|tqG4cXTfOAY|560}} | ||
| + | '''Notes:'''<br/> | ||
| + | *This video demonstrates the medusa boosts and how to execute. | ||
| + | *The higher your boost the more frames you save.<br/> | ||
| + | |||
| + | |||
| + | '''Visual Guide for Boosting''' | ||
| + | |||
| + | [[File:Stage 1 1st Medusa Head Boost.jpg | 380px]] [[File:Stage 1 2nd Medusa Head Boost.jpg | 380px]] | ||
| + | |||
| + | </div> | ||
| + | </div> | ||
| + | |||
| + | ==Boss: Rowdain== | ||
| + | |||
| + | === Safe === | ||
| + | |||
| + | {{#ev:youtube|s9_7fMXrUvI|560||}} | ||
| + | '''Notes''' | ||
| + | *Whipping 4 times helps set up the timing so the first cross hits the horse head as it appears. | ||
| + | |||
| + | === Optimal === | ||
| + | {{#ev:youtube|LigyapdDlmo|560||}} | ||
| + | '''Notes''' | ||
| + | *You lose no time on clunk frames when you enter the boss as the transition is scripted. | ||
| + | *Jump 3 times before the fight starts as a cue for when to throw your crosses. | ||
| + | *Please see Joe's [[Cv4/tutorials#JoeDamillio.27s_.28Most.29_Bosses_Tutorial | boss tutorial]] as well for more detailed information. | ||
Latest revision as of 03:20, 19 May 2023
 | |
| Game | Super Castlevania IV |
|---|---|
| Level sections | 1-1, 1-2, 1-3 |
| Level name | Horse Stables |
| Previous level | None |
| Next level | Stage 2 |
Safe Route
Notes
- This route is intended for beginners and avoids most damage boosts to get through the stage.
Optimal Route
Notes
- At 1:10 performs the wall clip (saves ~2.5). A tutorial can be found below.
- At 1:20 this skeleton is random. If he does not jump you will take a secondary boost in the next screen.
- At 2:00 performs a medusa boost with a limp whip, (each saves ~.25) see visual cues below for more information.
- At 2:20 for more information on the boss fight see below section.
1-2 Wall Clip Tutorials
Notes:
- This trick saves ~2.5 over normal strat and the inputs are precise to getting into the wall successfully.
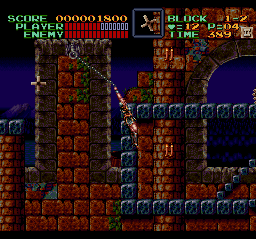
- When connecting to the ring the screen needs to scroll left so the game will try to eject you to the right side of the wall.
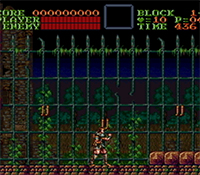
- These are the 4 pixels where Simon can jump into the screen transition. See visuals below.
- For other tutorials on wall clip see link here.
Frame to let go
Pixels To Jump Into Transition
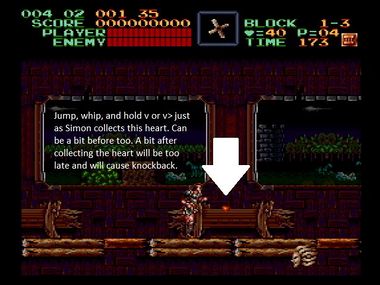
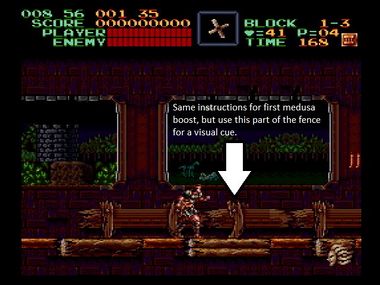
1-3 Medusa Boosts
Boss: Rowdain
Safe
Notes
- Whipping 4 times helps set up the timing so the first cross hits the horse head as it appears.
Optimal
Notes
- You lose no time on clunk frames when you enter the boss as the transition is scripted.
- Jump 3 times before the fight starts as a cue for when to throw your crosses.
- Please see Joe's boss tutorial as well for more detailed information.


