Difference between revisions of "User:Crismas"
| Line 83: | Line 83: | ||
</div> | </div> | ||
</div> | </div> | ||
| + | |||
| + | |||
| + | ===1-2 Ring Room Zip=== | ||
| + | {{#ev:youtube|n7EmbDmursw|560||}} | ||
| + | '''Notes:''' | ||
| + | *2 frame window. Much more difficult than wall clip, since you have to adjust during the swing to get the correct angle. | ||
| Line 109: | Line 115: | ||
== Safe Route == | == Safe Route == | ||
| − | + | {{#ev:youtube|VfbSwfDC8YI|560}} | |
| − | + | '''Notes'''<br/> | |
== Optimal Route == | == Optimal Route == | ||
| Line 117: | Line 123: | ||
{{#ev:youtube|FGP_9VUP6Go|560}} [NEED AN UPDATED VIDEO WITH STANDARD OPTIMAL STRATS] | {{#ev:youtube|FGP_9VUP6Go|560}} [NEED AN UPDATED VIDEO WITH STANDARD OPTIMAL STRATS] | ||
| − | Notes | + | '''Notes''' <br/> |
At 1:10 performs the wall clip (saves ~2.5). A tutorial can be found below.<br/> | At 1:10 performs the wall clip (saves ~2.5). A tutorial can be found below.<br/> | ||
At 1:20 this skeleton is random. If he does not jump you will take a secondary boost in the next screen.<br/> | At 1:20 this skeleton is random. If he does not jump you will take a secondary boost in the next screen.<br/> | ||
| Line 123: | Line 129: | ||
At 2:20 for more information on the boss fight see below section<br/> | At 2:20 for more information on the boss fight see below section<br/> | ||
| − | <div class="toccolours mw-collapsible mw-collapsed" style="width: | + | <div class="toccolours mw-collapsible mw-collapsed" style="width:770px"> |
'''1-2 Wall Clip Tutorial''' | '''1-2 Wall Clip Tutorial''' | ||
<div class="mw-collapsible-content">{{#evt: service=twitchvod|id=394702574|dimensions=560|urlargs=autoplay=false&parent=castlevaniaspeedruns.com}} | <div class="mw-collapsible-content">{{#evt: service=twitchvod|id=394702574|dimensions=560|urlargs=autoplay=false&parent=castlevaniaspeedruns.com}} | ||
'''Notes:'''<br/> | '''Notes:'''<br/> | ||
| − | * | + | *This trick saves ~2.5 over normal strat and the inputs are precise to getting into the wall successfully. |
| − | * | + | *These are the 4 pixels where Simon can jump into the screen transition. See visuals below. |
| + | *For other tutorials on wall clip see link here.<br/> | ||
| + | <br/> | ||
''' Frame to let go ''' | ''' Frame to let go ''' | ||
[[File:WallClipFrame_to_let_go.png]] | [[File:WallClipFrame_to_let_go.png]] | ||
| + | |||
''' Pixels To Jump Into Transition ''' | ''' Pixels To Jump Into Transition ''' | ||
| − | [[File:WallClipTPpixel1.jpg | 320px]] | + | [[File:WallClipTPpixel1.jpg | 320px]] |
| − | [[File:WallClipTPpixel2.jpg | 320px]] | + | [[File:WallClipTPpixel2.jpg | 320px]] |
| − | [[File:WallClipTPpixel3.jpg | 320px]] | + | [[File:WallClipTPpixel3.jpg | 320px]] |
| − | [[File:WallClipTPpixel4.jpg | 320px]] | + | [[File:WallClipTPpixel4.jpg | 320px]] |
</div> | </div> | ||
</div> | </div> | ||
| − | <div class="toccolours mw-collapsible mw-collapsed" style="width: | + | <div class="toccolours mw-collapsible mw-collapsed" style="width:770px"> |
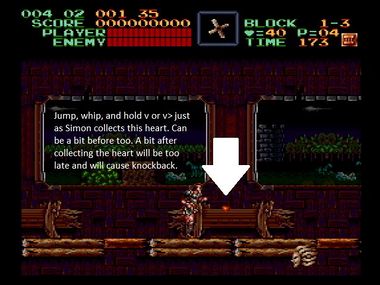
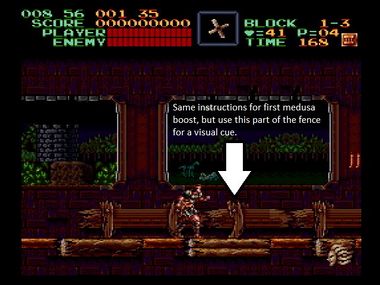
| − | '''1-3 Medusa Boosts | + | '''1-3 Medusa Boosts''' |
<div class="mw-collapsible-content">{{#ev:youtube|tqG4cXTfOAY|560}} | <div class="mw-collapsible-content">{{#ev:youtube|tqG4cXTfOAY|560}} | ||
'''Notes:'''<br/> | '''Notes:'''<br/> | ||
| Line 151: | Line 160: | ||
*Testing<br/> | *Testing<br/> | ||
| − | [[File:Stage 1 1st Medusa Head Boost.jpg | | + | |
| + | '''Visual Guide for Boosting''' | ||
| + | [[File:Stage 1 1st Medusa Head Boost.jpg | 380px]] [[File:Stage 1 2nd Medusa Head Boost.jpg | 380px]] | ||
</div> | </div> | ||
</div> | </div> | ||
| − | |||
| − | |||
| − | |||
| − | |||
| − | |||
| − | |||
| − | |||
| − | |||
| Line 169: | Line 172: | ||
{{#ev:youtube|EOXYQJoktdg|560||}} | {{#ev:youtube|EOXYQJoktdg|560||}} | ||
| − | |||
| − | |||
| − | |||
| − | |||
===Stage 1 Route Improvement=== | ===Stage 1 Route Improvement=== | ||
| Line 179: | Line 178: | ||
*This showcases an alternative bat strat | *This showcases an alternative bat strat | ||
| − | ==Boss | + | ==Boss: Rowdain== |
''' Video with inputs''' | ''' Video with inputs''' | ||
{{#ev:youtube|LigyapdDlmo|560||}} | {{#ev:youtube|LigyapdDlmo|560||}} | ||
Revision as of 22:53, 27 March 2022
Woah
Need to update the zip section in 4-4 with the new zip setup.
https://www.twitch.tv/videos/1047072938?filter=highlights&sort=time
Maybe add 5-cyc drac also, just for reference: https://www.twitch.tv/videos/460383934?filter=highlights&sort=time
Death strats should be added too. I have to relook into stage B anyway. https://www.twitch.tv/videos/408301224?filter=highlights&sort=time
At 1:00 this boost is not needed or "save" but you could recover since you hold up to make sure to land on stairs otherwise. Being to far off will make you boost below the top platform so I don't recommend till you are very sure about this strat.
TEST
Contents
HEADER
TEST
2022 WIKI EDITS
Main Area/Stage
- Maybe include short descriptions of each so its more informative to whats in each section
- GENERAL: look through this and see what addtions to add
- Remove “Gold Splits” I wouldnt include this unless its nested somewhere else
- Hacking can be deleted or moved/nested somewhere else
- Community needs to be worked on and figured out
- Video theory/TAS section could be nested under "General" instead, would be better to keep everything simple for the main area as possible
- Other Categories is fine, just need someone to work on it......
INDIVIDUAL LEVELS
Aside from going into depth for each stage and add missing strats/info it needs to be cleaned up.
Structure could follow the basics. Could also consider SHOW/HIDE method like how CV1 is done? Not sure about this yet.
- BEGINNER
- OPTIMAL
- BACKUPS
- BOSS
>BEGINNER
>OPTIMAL
For stages that have multiple videos for strats like Wall Clip + Zip, we may need to consider just linking a playlist on Youtube with it? Or, only showcase a couple and then link the other ones (instead of embedded), it gets too cluttered, its also nice to just have a couple and then explain the main differences between them.
For instance Zip can maybe show original method, NiceGuy (Whip Only) and JC (NiceGuy Modified) method. They're pretty strong differences between them and have diff set-ups and uses. Whereas other methods are just tutorials that rehash and explain the same thing.
For newer zip we can obviously have this too, and we would need to explain the time differences as well so someone doesnt get confused.
STAGE 1 EXTRAS
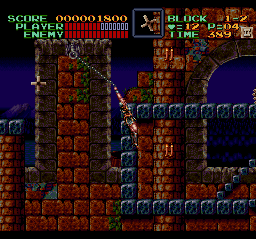
1-2 Ring Wall Clip
1-2 Clip Tutorial (Joe)
Notes:
- 2 frame window (saves ~0.6sec)
1-2 Clip Tutorial (Hanage)
1-2 Clip Tutorial minimal input (bogaabogaa)
1-2 Clip Tutorial (bogaabogaa)
- Note: Left screen movement as you connect and the right frame to let go will make it successful.
1-2 Ring Room Zip
Notes:
- 2 frame window. Much more difficult than wall clip, since you have to adjust during the swing to get the correct angle.
--
General Information
Tricks and Game Mechanics The basics you'll need to start learning the game with, technical information and visual cues are provided here to help.
Tutorials
Glitches and Softlocks
Community info
Leaderboards
Discord
Safe Route
Notes
Optimal Route
[NEED AN UPDATED VIDEO WITH STANDARD OPTIMAL STRATS]Notes
At 1:10 performs the wall clip (saves ~2.5). A tutorial can be found below.
At 1:20 this skeleton is random. If he does not jump you will take a secondary boost in the next screen.
At 2:00 performs medusa boost, each saves ~.2 see visual cues below for more information.
At 2:20 for more information on the boss fight see below section
1-2 Wall Clip Tutorial
1-2 Ring-Room Full-Halfie
Stage 1 Route Improvement
Notes:
- This showcases an alternative bat strat
Boss: Rowdain
Video with inputs
Strat compare and how much frames they save
Stair Skip (4 Frames)
1-2 Ring-Room Time Save
- This showcases the time saved from successfully executing the Ring Glitch.


