Difference between revisions of "SOTN/Techniques"
SestrenExsis (talk | contribs) (Reword Death Skip intro) |
SestrenExsis (talk | contribs) m (Remove unnecessary sub-sub-header) |
||
| Line 16: | Line 16: | ||
[[File:Sotn_neutron_bomb_death_skip_visual_cues_2x.png | 320px]] | [[File:Sotn_neutron_bomb_death_skip_visual_cues_2x.png | 320px]] | ||
| − | |||
{{#ev:youtube|nw2WbUl6Id0|480}} | {{#ev:youtube|nw2WbUl6Id0|480}} | ||
Revision as of 23:17, 9 November 2021
Several glitches have been discovered in Castlevania: Symphony of the Night, and they are organized here into Major Glitches, Minor Glitches, and Save Corruption to help in understanding which glitches are legal for a given category of speedrunning the game.
Contents
Major Glitches
Major glitches are not allowed in the Glitchless categories. All major glitches are allowed in the Any% NSC category with the sole exception of Save Corruption, detailed in its own section below.
Death Skip
Death Skip is the first major glitch you perform in Alucard Any% NSC, and there are multiple known methods for performing it. It is a crucial glitch to perform in Alucard Any% NSC, because it allows Alucard to keep his starting equipment, which the game ordinarily takes away from you when you first encounter Death. The Standard method of executing this trick uses the Neutron Bomb gained during the Prologue, and it and the other methods are detailed below.
Neutron Bomb Death Skip
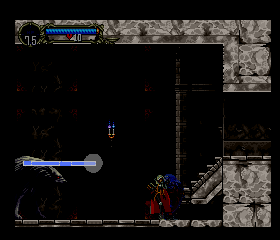
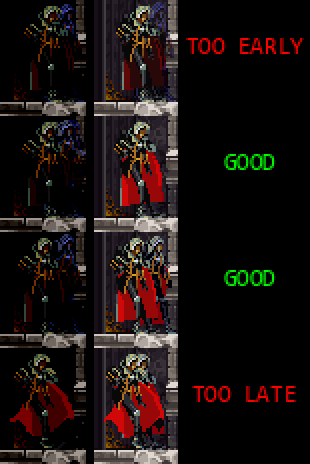
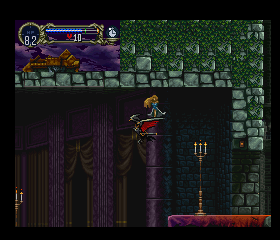
Both this version and the Spell method described below rely on a Level Up animation as the trigger for a Reverse Shift Line. Alucard begins the game at Level 1 with 0 XP, and will first level up upon reaching 100 XP. The goal is to arrive at the room just before you first encounter Death having between 88 and 99 XP and with one last Warg to kill. Since you encounter 7 Wargs prior to this point, worth 12 XP each, all you need to do is kill between 1 and 3 Zombies (worth 5 XP each) from the room where they spawn to have the right amount of experience, assuming you kill all the Wargs you encounter along the way. Upon reaching the last Warg, allow it to charge at you right as you jump over it. Once it is on your left, you will hit the breakable block at the base of the stairs, revealing a Turkey. Move to the right until you are touching the edge of the stairs, and equip the Neutron Bomb. The next step requires careful timing, as you want to activate the Neutron Bomb at the exact moment you are walking to the left of a certain vertical line on the screen. Use pause buffering and knowledge of the visual cues to time it correctly. Once you see the Level Up animation start to play, hold down the Dash button until the animation finishes and Alucard dashes. If done correctly, all that is left is to walk to the right against the stair, do a full jump to the right, and enter the next room. If you timed it correctly, you should see a brief flicker as you enter the next room for a frame, then immediately are transported to the room after it. As you climb the stairs in the next room, and proceed to the room to the left at the top of the stairs, it is vital that you jump over the gap in that room and do not fall back down into the room where you would have encountered Death. Doing so will cause the game to go into a glitched state and will soft-lock you, ending the run.
TODO: Finish describing the Neutron Bomb version of Death Skip
Spell Death Skip
TODO: Describe the Spell version of Death Skip
Big Toss Death Skip
TODO: Describe the Big Toss version of Death Skip
Shop Glitch
As with Death Skip, there is more than one method of executing the Shop Glitch. The Standard method of executing it uses the Faerie Card acquired in the Library, and it and the other methods are detailed below.
Faerie Card Shop Glitch
Executing the Faerie Card Shop Glitch requires a high-value Gem (preferably a Garnet), and a Faerie Card Relic which has not yet been activated. It also requires that you have not yet visited the Shop in your run.
- Stand just outside of the doorway to the Shop while facing away
- While standing still, enable the Fearie Card Relic, and wait a few seconds
- Once the Faerie begins to speak, press dash to quickly enter the Shop while she is still talking
- Once in the shop, open the Sell Gem menu
- While the Sell Gem menu is still open, open your Equipment screen (thanks to the glitch, you can now do this!)
- Equip the Garnet (or other Gem) you collected earlier
- Leave your equipment screen and return to the Sell Gem menu (notice that you can still sell your equipped Gem)
- Sell the gem you just equipped
At this point, you should have 255 of the Gem you sold (thanks to an integer underflow that occurred when you sold the Gem you had equipped), which you can freely sell for enough money to buy the Duplicator and other shop items.
Sword Brothers Shop Glitch
TODO: Describe Sword Brothers Shop Glitch
Wolf Floor Clip
TODO: Describe Wolf Floor Clip
Library Floor Clip
TODO: Describe Library Floor Clip
Richter Skip
There are two methods of performing Richter Skip, one method using Wolf form, and another method using Bat form. Both methods are detailed below. The Wolf Method is part of the Standard Route for the Any% NSC category. The Bat Method can be easier or more reliable for some players, but is slower to execute. The goal for both methods is to be able to unlock the camera in the area just outside of the Throne Room. Doing so will trigger a glitch when you try to enter the Throne Room, causing you to bypass the fight with Richter altogether and triggering the cutscene that plays just before you enter the Inverted Castle.
Wolf Method Richter Skip
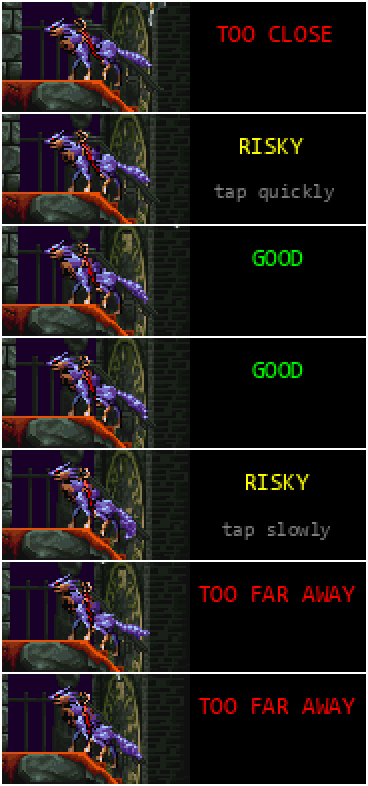
The Wolf method of Richter Skip involves using a very precise jump at the top of the stairs while in Wolf form to jump over an invisible area that would normally trigger the camera to lock on to the hallway leading to the Throne Room. There is a 4-pixel window for the initial positioning for the Wolf's feet. Once you have your initial position correct, you will need to tap left twice in quick succession, and tap the jump button on the frame immediately following your second left tap. The timing between your two left taps may vary if you are on the outer edges of the proper positioning.
Once you execute the jump, you will be able to confirm that the glitch worked by looking at the top of the screen. If the camera can move freely up and down while you are in the room after the jump and you can see moving clouds at the top of the screen, then the glitch was successful.
Once you have confirmed that the camera is unlocked, all you need to do now is proceed to the Throne Room to trigger the skip and proceed on to the Inverted Castle.
Bat Method Richter Skip
TODO: Describe Bat Method of Richter Skip
Relic Skip
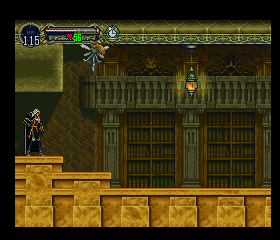
Relic Skip is the last of the major glitches that you perform in the Any% category. The primary method for executing it involves using a Heart Refresh item that is typically earned from ending the Prologue at the start of the game with zero Hearts.
Heart Refresh Relic Skip
The steps for executing the Heart Refresh Relic Skip are as follows:
- Set your sub-pixel to the correct value
- While in bat form, move against the ledge briefly (this will set Alucard's sub-pixel to the correct value)
- Fly up enough that you can do a canceled Wing Smash and land roughly near the position you need to setup the glitch
- Equip Heart Refresh
- Move into the correct position on the ledge and face to the left
- Execute a Reverse Shift Line
- Walk to the right immediately followed by activating the Heart Refresh (at this point you should be able to visually confirm whether or not your positioning was correct)
- While the Heart Refresh animation is playing, hold down the Dash button and don't let go until Alucard Dashes after the Heart Refresh animation finishes
- Walk briefly against the ledge just before the doorway to the Save Room
- Jump onto the ledge and walk to the left into the Save Room
- Travel along the ceiling
- As soon as the second Black Screen appears, hold down the Bat Transform button (if you don't see the flicker of a second Black Screen, return to the previous room and start the trick again)
- Let go of the Bat Transform button once you are repositioned into the ceiling of the room below the Save Room
- Perform six consecutive chained Wing Smashes while flying in the ceiling to the left
- As the sixth Wing Smash finishes and Alucard untransforms, hold Up and to the Left while mashing the Jump button (if at any point you are forced out of the ceiling, you will have to return to the room again and start all over)
- Keep mashing the Jump button until the flickering stops and you are forced into the other Save Room just outside of the lift that leads to Dracula's chambers
TODO: Finish describing Relic Skip
Minor Glitches
Minor glitches are permitted in all categories of the game, and are usually unintended mechanics or quirks of the game
TODO: List out the minor glitches
Save Corruption
Save corruption is put into its own category, as it is the only major glitch that is not allowed in any of the normal categories.
TODO: Describe the save corruption glitch
