Difference between revisions of "Cv4/stage1"
From Castlevania Speedrunning
Bogaabogaa (talk | contribs) (→Sub 32 Video Serie) |
|||
| Line 7: | Line 7: | ||
| next = [[cv4/stage2 | Stage 2]] | | next = [[cv4/stage2 | Stage 2]] | ||
}} | }} | ||
| + | |||
== Safe Route == | == Safe Route == | ||
| − | + | {{#ev:youtube|VfbSwfDC8YI|560}} | |
| − | |||
| − | |||
| − | {{#ev:youtube| | ||
| − | |||
| − | |||
| − | |||
| − | |||
| − | |||
| − | |||
| − | + | '''Notes'''<br/> | |
| − | |||
== Optimal Route == | == Optimal Route == | ||
| − | |||
| − | |||
| − | |||
{{#ev:youtube|FGP_9VUP6Go|560}} | {{#ev:youtube|FGP_9VUP6Go|560}} | ||
| − | + | '''Notes''' <br/> | |
| − | + | *At 1:10 performs the wall clip (saves ~2.5). A tutorial can be found below.<br/> | |
| − | + | *At 1:20 this skeleton is random. If he does not jump you will take a secondary boost in the next screen.<br/> | |
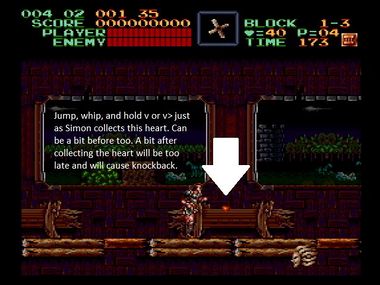
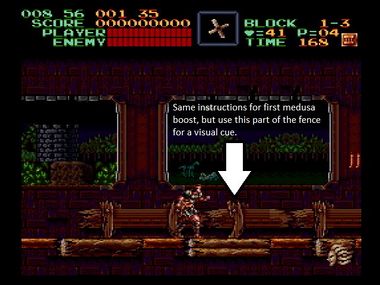
| − | + | *At 2:00 performs a medusa boost with a [[Cv4/tricks#Limp_Whip | limp whip]], each saves ~.2 see visual cues below for more information.<br/> | |
| − | + | *At 2:20 for more information on the boss fight see below section<br/> | |
| − | |||
| − | |||
| − | ''' | ||
| − | < | ||
| − | |||
| − | |||
| − | </ | ||
| − | </ | ||
| − | |||
| − | |||
| − | |||
| − | |||
| − | </ | ||
| − | </ | ||
| − | |||
| − | |||
| − | |||
| − | |||
| − | |||
| − | |||
| − | |||
| − | |||
| − | |||
| − | |||
| − | <div class="toccolours mw-collapsible mw-collapsed" style="width: | + | <div class="toccolours mw-collapsible mw-collapsed" style="width:770px"> |
| − | '''1-2 Wall Clip Tutorial | + | '''1-2 Wall Clip Tutorial''' |
<div class="mw-collapsible-content">{{#evt: service=twitchvod|id=394702574|dimensions=560|urlargs=autoplay=false&parent=castlevaniaspeedruns.com}} | <div class="mw-collapsible-content">{{#evt: service=twitchvod|id=394702574|dimensions=560|urlargs=autoplay=false&parent=castlevaniaspeedruns.com}} | ||
| − | </ | + | '''Notes:'''<br/> |
| − | </ | + | *This trick saves ~2.5 over normal strat and the inputs are precise to getting into the wall successfully. |
| + | *These are the 4 pixels where Simon can jump into the screen transition. See visuals below. | ||
| + | *For other tutorials on wall clip see link here.<br/> | ||
| + | <br/> | ||
''' Frame to let go ''' | ''' Frame to let go ''' | ||
[[File:WallClipFrame_to_let_go.png]] | [[File:WallClipFrame_to_let_go.png]] | ||
| + | |||
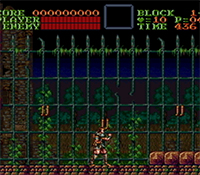
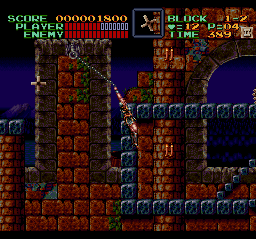
''' Pixels To Jump Into Transition ''' | ''' Pixels To Jump Into Transition ''' | ||
| − | [[File:WallClipTPpixel1.jpg | 320px]] | + | [[File:WallClipTPpixel1.jpg | 320px]] |
| − | [[File:WallClipTPpixel2.jpg | 320px]] | + | [[File:WallClipTPpixel2.jpg | 320px]] |
| − | [[File:WallClipTPpixel3.jpg | 320px]] | + | [[File:WallClipTPpixel3.jpg | 320px]] |
| − | [[File:WallClipTPpixel4.jpg | 320px]] | + | [[File:WallClipTPpixel4.jpg | 320px]] |
| + | </div> | ||
| + | </div> | ||
| − | '''Notes:''' | + | <div class="toccolours mw-collapsible mw-collapsed" style="width:770px"> |
| − | * | + | '''1-3 Medusa Boosts''' |
| − | * | + | <div class="mw-collapsible-content">{{#ev:youtube|tqG4cXTfOAY|560}} |
| + | '''Notes:'''<br/> | ||
| + | *TESTING<br/> | ||
| + | *Testing<br/> | ||
| − | |||
| − | ''' | + | '''Visual Guide for Boosting''' |
| − | |||
| − | [[File:Stage 1 1st Medusa Head Boost.jpg | | + | [[File:Stage 1 1st Medusa Head Boost.jpg | 380px]] [[File:Stage 1 2nd Medusa Head Boost.jpg | 380px]] |
| − | + | </div> | |
| − | + | </div> | |
| − | |||
| − | |||
| − | |||
| − | |||
| − | |||
| − | |||
| − | |||
| − | |||
| − | |||
| − | |||
| − | |||
| − | |||
| − | |||
| − | |||
| − | == | + | ==Boss: Rowdain== |
| + | === Safe === | ||
| − | + | [NEED VIDEO]<br/> | |
| − | + | '''Notes''' | |
| − | + | === Optimal === | |
| − | === | + | {{#ev:youtube|LigyapdDlmo|560||}} |
| − | + | '''Notes''' | |
| − | {{#ev:youtube| | ||
| − | |||
| − | |||
| − | |||
| − | |||
| − | |||
Revision as of 01:25, 14 April 2022
 | |
| Game | Super Castlevania IV |
|---|---|
| Level sections | 1-1, 1-2, 1-3 |
| Level name | Horse Stables |
| Previous level | None |
| Next level | Stage 2 |
Safe Route
Notes
Optimal Route
Notes
- At 1:10 performs the wall clip (saves ~2.5). A tutorial can be found below.
- At 1:20 this skeleton is random. If he does not jump you will take a secondary boost in the next screen.
- At 2:00 performs a medusa boost with a limp whip, each saves ~.2 see visual cues below for more information.
- At 2:20 for more information on the boss fight see below section
1-2 Wall Clip Tutorial
Boss: Rowdain
Safe
[NEED VIDEO]
Notes
Optimal
Notes


