Difference between revisions of "Cv4/stageB"
From Castlevania Speedrunning
(→Safe Route) |
|||
| (41 intermediate revisions by 3 users not shown) | |||
| Line 1: | Line 1: | ||
| − | + | {{Infobox level | |
| − | + | | image = cv4stageb.jpg | |
| − | + | | game = Super Castlevania IV | |
| + | | level_name = Dracula's Keep | ||
| + | | level_sections = B1, B2, B3, B4 | ||
| + | | previous = [[cv4/stageA | Stage A]] | ||
| + | | next = None | ||
| + | }} | ||
| − | + | == Safe Route == | |
| − | == | + | === Sub 40 Video Series === |
| + | {{#ev:youtube|WdUYZQhuYik|560}} | ||
| − | == Other Optimal Strategies == | + | == Optimal Route == |
| + | {{#ev:youtube|w6kXF1-scAU|560}} | ||
| + | Note: Sogra 8 Cycle, Dracula 7 Cycle. They could each be one or optimal 2 cycles shorter. | ||
| + | |||
| + | === Other Optimal Strategies === | ||
Stage B-1: Optimal Bridge Strategies | Stage B-1: Optimal Bridge Strategies | ||
| − | + | {{#ev:youtube|BILdNHxWaas|560||}} | |
== Backup Strats == | == Backup Strats == | ||
| − | Obtaining cross and multipliers after dying | + | === Obtaining cross and multipliers after dying === |
| − | + | ||
| − | Notes: | + | {{#evt: service=twitchvod|id=48179912|dimensions=560|urlargs=autoplay=false&parent=castlevaniaspeedruns.com}} |
| + | '''Notes:''' | ||
*10 hits will gain you the II multiplier | *10 hits will gain you the II multiplier | ||
| − | == | + | == Boss: Slogra == |
| + | [Video] | ||
| + | |||
| + | == Boss: Gaibon == | ||
| + | |||
| + | === Optimal Strat Visual Guide === | ||
| + | |||
| + | [[File:Gaibon 01.jpg|460px]] [[File:Gaibon 02.jpg|460px]] | ||
| + | |||
| + | [[File:Gaibon 03.jpg|460px]] [[File:Gaibon 04.jpg|460px]] | ||
| + | |||
| + | == Boss: Death == | ||
| + | |||
| + | === Optimal === | ||
| + | |||
| + | {{#ev:youtube|ZesM-pSvOMw|560||}} | ||
| + | '''Notes:''' | ||
| + | *Hold the jump button to prevent Simon from moving while whipping diagonally | ||
| + | *At 1:04 to 1:05 you can hear the transition from the dying noise to none, this is the cue to jump three times (2 in place and 1 forward) | ||
| + | |||
| + | ===Jay_Cee Death Strat=== | ||
| + | {{#evt: service=twitchvod|id=408301224|dimensions=560|urlargs=autoplay=false&parent=castlevaniaspeedruns.com}} | ||
| + | |||
| + | == Boss: Dracula == | ||
| − | + | === Optimal === | |
| − | + | '''Notes:''' | |
| + | *A standard clean fight with good spawns will be average around 6 (best) to 7 cycles. | ||
| − | + | === Insanely Optimal === | |
| − | + | '''5 Cycle Dracula''' | |
| − | |||
| − | + | {{#evt: service=twitchvod|id=425323053|dimensions=560|urlargs=autoplay=false&parent=castlevaniaspeedruns.com}} | |
| + | '''Notes:''' | ||
| + | *'''5 cycle is not that easy to pull off!!''' It requires knowledge of diagonal whip cancels and good spawns. | ||
| + | * This method with the diagonal whip works well since it is easy to release one of the directions to cancel the whip. | ||
| + | * To get a 5 cycle you are required to get 6 whips in for one cycle. | ||
Latest revision as of 04:35, 24 May 2023
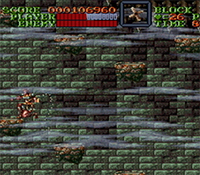 | |
| Game | Super Castlevania IV |
|---|---|
| Level sections | B1, B2, B3, B4 |
| Level name | Dracula's Keep |
| Previous level | Stage A |
| Next level | None |
Contents
Safe Route
Sub 40 Video Series
Optimal Route
Note: Sogra 8 Cycle, Dracula 7 Cycle. They could each be one or optimal 2 cycles shorter.
Other Optimal Strategies
Stage B-1: Optimal Bridge Strategies
Backup Strats
Obtaining cross and multipliers after dying
Notes:
- 10 hits will gain you the II multiplier
Boss: Slogra
[Video]
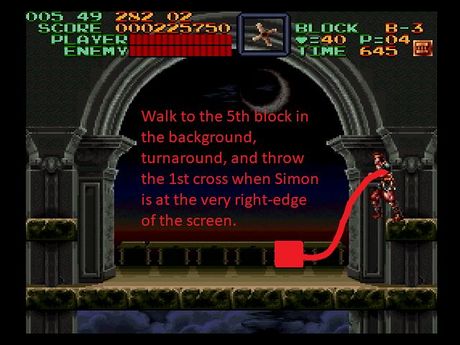
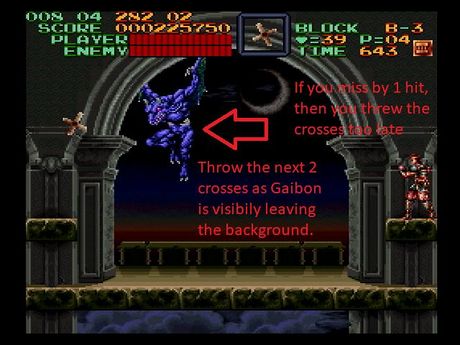
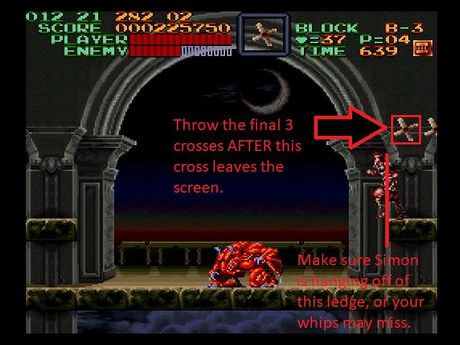
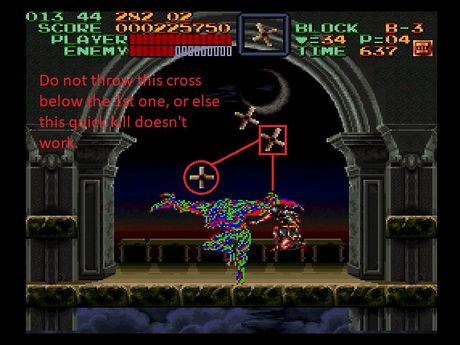
Boss: Gaibon
Optimal Strat Visual Guide
Boss: Death
Optimal
Notes:
- Hold the jump button to prevent Simon from moving while whipping diagonally
- At 1:04 to 1:05 you can hear the transition from the dying noise to none, this is the cue to jump three times (2 in place and 1 forward)
Jay_Cee Death Strat
Boss: Dracula
Optimal
Notes:
- A standard clean fight with good spawns will be average around 6 (best) to 7 cycles.
Insanely Optimal
5 Cycle Dracula
Notes:
- 5 cycle is not that easy to pull off!! It requires knowledge of diagonal whip cancels and good spawns.
- This method with the diagonal whip works well since it is easy to release one of the directions to cancel the whip.
- To get a 5 cycle you are required to get 6 whips in for one cycle.
