Difference between revisions of "Cv4/stage2"
From Castlevania Speedrunning
(→2-1 Video by Crismas) |
(→Boss: Medusa) |
||
| (14 intermediate revisions by 2 users not shown) | |||
| Line 8: | Line 8: | ||
}} | }} | ||
| − | |||
== Safe Route == | == Safe Route == | ||
| − | |||
| − | |||
| − | |||
| − | |||
| − | |||
| − | |||
| − | |||
| − | |||
| − | |||
| − | |||
| − | |||
{{#ev:youtube|FTuq3gSB23g|560}} | {{#ev:youtube|FTuq3gSB23g|560}} | ||
| + | '''Notes''' | ||
| + | *This route showcases a safe way to get through the stage without any extra boosts. It is intended for those who want to achieve sub 40 minutes. | ||
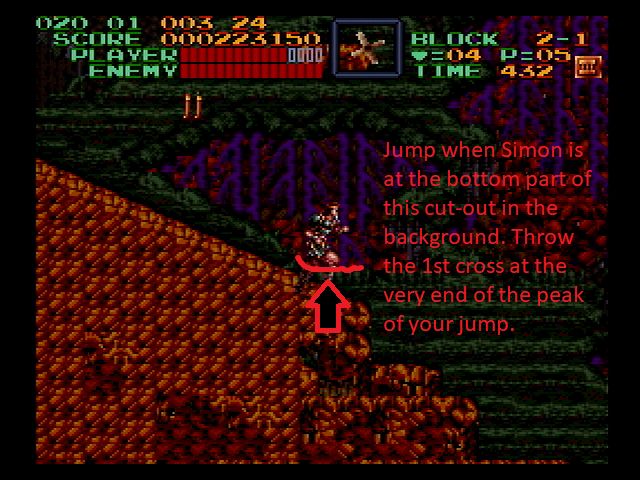
| + | *The hands that spawn from the ground in the beginning of 2-1 are RNG dependent. To get rid of potential spawns you want to jump and throw a cross low enough to hit the hands when they spawn. The video above shows an example of spots that are good to do this jump/low cross combo | ||
| + | *At 1:10 the frogs in this section will always have different jump patterns and can either do small hops or long jumps forward. A well timed cross and potential backup whip as seen in the video can help to get rid of them quickly before they become a problem | ||
| + | *At 1:20 In case you really need it there is a big wall meat for health refill hidden in the wall next right side of the candle on the bottom. | ||
| + | *At 1:56 The water here works in both directions. You want to make sure to go with the flow to get the best momentum. In other words: Keep walking while the water goes right way and reduce Simon’s time on the ground while its going backwards (by jumping). | ||
== Optimal Route == | == Optimal Route == | ||
| − | |||
{{#ev:youtube|FzppW-hQ_0Q|560}} | {{#ev:youtube|FzppW-hQ_0Q|560}} | ||
| + | '''Notes''' | ||
| + | *It is important to note that your hearts will carry over into stage 3 and should always leave with 1 heart. | ||
| − | = | + | <div class="toccolours mw-collapsible mw-collapsed" style="width:770px"> |
| − | + | '''2-1 Armadillo Kill''' | |
| − | = | + | <div class="mw-collapsible-content"> |
| − | |||
| − | + | [[File:Stage 2 Jay_Cee Armadillo Kills.jpg]] | |
| − | |||
| − | + | '''Notes:''' | |
| − | + | *Jay_Cee's Armadillo Kill | |
| − | + | </div> | |
| + | </div> | ||
Latest revision as of 15:13, 10 May 2024
 | |
| Game | Super Castlevania IV |
|---|---|
| Level sections | 2-1, 2-2, 2-3 |
| Level name | Forest River |
| Previous level | Stage 1 |
| Next level | Stage 3 |
Safe Route
Notes
- This route showcases a safe way to get through the stage without any extra boosts. It is intended for those who want to achieve sub 40 minutes.
- The hands that spawn from the ground in the beginning of 2-1 are RNG dependent. To get rid of potential spawns you want to jump and throw a cross low enough to hit the hands when they spawn. The video above shows an example of spots that are good to do this jump/low cross combo
- At 1:10 the frogs in this section will always have different jump patterns and can either do small hops or long jumps forward. A well timed cross and potential backup whip as seen in the video can help to get rid of them quickly before they become a problem
- At 1:20 In case you really need it there is a big wall meat for health refill hidden in the wall next right side of the candle on the bottom.
- At 1:56 The water here works in both directions. You want to make sure to go with the flow to get the best momentum. In other words: Keep walking while the water goes right way and reduce Simon’s time on the ground while its going backwards (by jumping).
Optimal Route
Notes
- It is important to note that your hearts will carry over into stage 3 and should always leave with 1 heart.
