SOTN/Alucard Any% NSC Blindfolded
Contents
- 1 Introduction to SOTN Alucard Blindfolded Any% NSC
- 2 Setup
- 3 Basic Moveset
- 4 Start
- 5 Save after Death Skip
- 6 Save before Slogra and Gaibon
- 7 Save before Doppelganger
- 8 Save in Colosseum
- 9 Save before Soul of Bat
- 10 Save after Soul of Bat
- 11 Save before Clock Tower
- 12 Save before Richter Skip
- 13 Save after Richter Skip
- 14 Save in Reverse Colosseum
- 15 Save before Relic Skip
Introduction to SOTN Alucard Blindfolded Any% NSC
Because of the nature of this run, the sections have been broken up by save rooms. This has been done so that the route is easier to practice, and so that run-ending mistakes can be corrected during a run by loading the most recent save.
The primary challenges during a Blindfolded run are memorization, keeping track of where you are in a room and in the castle, and dealing with randomness in enemy patterns. The route detailed below (TODO) takes advantage of numerous sound cues and normalization setups to control for randomness and minor input error as much as possible. There are still a few sections and tricks that require frame perfect or near-frame perfect inputs.
Before you attempt a full blindfolded run, it can be helpful to practice each segment without a blindfold at first, but still utilizing the blindfolded moveset. After getting familiar with the segment this way, you can then attempt it with a blindfold on. It can also be very helpful to record your blindfolded attempts, so you can review your run afterward and learn what sort of mistakes you are likely to make during a given section.
Setup
Get a CLEAR file
Basic Moveset
Due to the constraints of the category, visual confirmation of the player's position is not possible, and a normalized set of moves is needed. What follows are a list of basic maneuvers referenced throughout the rest of this guide that change the player's position by fixed amounts. Most areas can be navigated through a specific combination of these movements with relative ease.
Dash
Not to be confused with Shield Dashing, which can alter Alucard's horizontal position by slightly-varying amounts, A simple Dash will always cause Alucard to move by a fixed amount. If Alucard is facing left, a Dash will cause him to move to the right, and vice versa.
On level ground with no objects to collide with, Alucard will travel exactly 50.75 pixels (the fractional portion is stored as subpixels) horizontally after performing an uninterrupted dash.
NOTE: Because the distance Alucard travels during a Dash includes subpixels, and two full dashes are exactly half a pixel less than one full jump, Alucard's distance can be adjusted by half a pixel in either direction on flat ground using a combination of dashes and jumps. This is utilized both during the Death Skip and Relic Skip setup to get Alucard into proper position.
Pivot
Jump
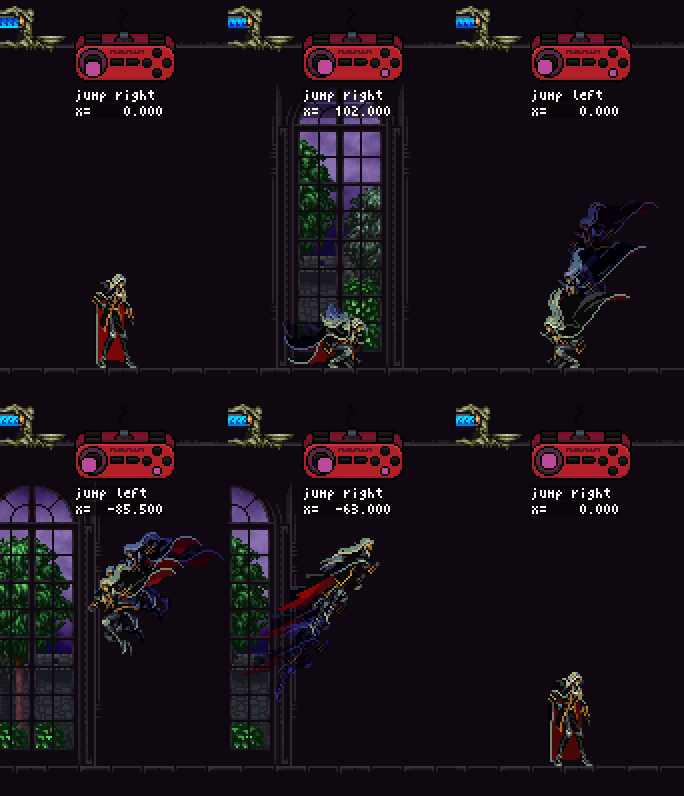
Throughout this guide, unless otherwise stated, a jump left or jump right refers to a specific movement where you begin from a diagonal crouch either leaning left or right, then hold the jump button down while still holding the diagonal direction for the duration of a full jump by Alucard. When performed correctly, it will allow Alucard to move a known and fixed distance. On level ground with no short ceilings to collide with, Alucard will travel exactly 102 pixels horizontally after performing a full jump.
Shield Dash until Room Transition
With consistent enough shield dashing, it is possible to hear a slight pause in Alucard's dashing sounds which occurs when Alucard leaves one room and enters another. You can use this sound cue to tell when you have reached the next room, which is helpful for moving through certain sections quickly and easily.
Shield Dash until Damage Check
Start
Prologue
Experience
Death Skip
NOTE: All actions in this guide, such as "Jump left" or "Jump right" refer to specific moves that are normalized for blindfolded play. Refer to the Basic Moveset (TODO: Create the Basic Moveset section) section for more detail.
If you are already proficient with the Neutron Bomb Death Skip in a normal Any% run, it is possible to execute the trick blindfolded the exact same way. However, there exists a normalized setup that can guarantee a 100% success rate if performed correctly. The setup revolves around getting Alucard to a very specific X position using a particular sequence of jumps and dashes, detailed below. Once Alucard is at this position, a map buffered input can be used.
- Set Alucard's X Position to a specific value
- Walk right against the ledge
- Crouch and slash while standing in place to break the block
- Jump right
- Stand up and dash left
- Jump right, colliding with the ledge
- Jump right again
- Stand up and dash left
- Jump right, colliding with the ledge
- Stand up and dash left
- Listen and wait for the Warg's attack
- Perform the following three times in a row while not getting hit by the Warg's attack
- Jump left
- Stand up and dash
- Dash again
- Equip Neutron Bomb
- Press MENU (to enter the menu screen)
- Press JUMP twice (to select Alucard's Right hand)
- Press DOWN (to select the Neutron Bomb)
- Press JUMP (to equip the Neutron Bomb to Alucard's Right hand)
- Press MENU (to return to the game screen)
- Map buffer holding LEFT and ATTACK (to use the Neutron Bomb)
- Open the map
- Hold left and attack
- While still holding left and attack, press the map button again to map buffer the inputs
- While the level up animation plays, hold DASH
- Walk right against the ledge
- Jump right while walking right until Alucard exits Death's room
