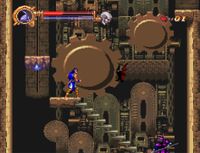
Dracx/stage6
From Castlevania Speedrunning
 | |
| Game | Castlevania: Dracula X |
|---|---|
| Previous level | Stage 5 |
| Next level | Stage 7 |
Contents
Safe
Notes:
- The graphical glitches are just a side effects of using save states.
- Kill the red skeleton at 0:03 to ensure he doesn't send you into the pit.
- Hold down-right on the dpad for the first two jumps at 0:24 so that you can't fall off into the pit.
- At 0:34, crouch to cancel the knockback, then quickly backflip onto the stairs.
- Don't jump while approaching the axe knight at 0:58 to trigger him to charge.
- Grab the axe at 1:07
- For the movement at 1:17 to catch the platform early:
- Position yourself on the middle-right part of the platform that's moving upwards.
- As late into the ascent of the moving platform as possible, perform a mid-height backflip onto the left cog, the jump on the right cog, and onto the top moving platform.
- If you mess something up and you need to wait another cycle, the candle above the left-side cog contains a rosary which you could use to temporarily kill all the medusa heads on screen.
- Grab the big hearts on the two top-right candles if you had to use a second item crash on the Stage 5 Werewolf boss.
Optimal
Notes:
- Again, you can hold down-right on the dpad while jumping to ensure you don't go too far right in-between jumps. But you do have to walk out a small distance or you'll hit the back side of the first red skeleton and fall into the pit.
- You can skip a jump on the moving platforms at 0:24 if you're fast enough. You can also backflip from the moving platform if you need a little bit extra height. Just ride an extra platform if you don't think you're going to make it.
- At 0:32, don't crouch cancel the knockback, just go for the backflip.
- At 0:34 is arguably the hardest skip of the level. Perform three backflips back to back, from the stairs to the cog, from the cog to the stairs, from the stairs to the moving platform. The better your timings, the more lenient the backflips' heights, but often times a max height has to be thrown in there.
- When you grab onto the upper stairs, begin climbing one step before backflipping to get a little bit higher.
- You can collect the axe at 1:00 and get onto the higher ledge with the same jump if you're precise enough.
- At 1:01, you have to stand at the extreme edge of the platform before initiating the neutral jump, and then turn right at a specific time, to get on the cog from the left side.
- Stand on the left side of the platform at 1:05 to make the next movements easier.
- Perform a high backflip onto the left cog, then jump straight onto the moving platform.
- While doing the backflip, whip as soon as you possibly can after the second B press to resume control asap!
- Grab the big hearts on the two top-right candles if you had to use a second item crash on the Stage 5 Werewolf boss.
Boss
Safe
Notes:
- Use the first axe some time while the white flash starts to wear out.
- Aside from that, just follow the movements in the video.
Optimal
Notes:
- Fire off two axes at the start and get three hits off of them. What you're looking for is for the first axe to deal a double hit, but without knocking Carmilla all the way back to the far left.
- The frame window for this varies depending on your exact position. Generally, the closer you are, the more lenient it is (up until a certain point of course). At its widest, this is a 6 frame window.