Difference between revisions of "Cv4/stage1"
From Castlevania Speedrunning
Bogaabogaa (talk | contribs) (→Optimal Route) |
Bogaabogaa (talk | contribs) (→Sub 32 Video Serie) |
||
| Line 30: | Line 30: | ||
=== Sub 32 Video Serie === | === Sub 32 Video Serie === | ||
{{#ev:youtube|FGP_9VUP6Go|560}} | {{#ev:youtube|FGP_9VUP6Go|560}} | ||
| + | |||
| + | Note: | ||
| + | Boost at 1:00 is not needed or "save" but you could recover since you hold up to make sure to land on stairs otherwise. Being to far off will make you boost below the top platform so I don't recommend till you are very sure about this strat. | ||
== Tutorials == | == Tutorials == | ||
Revision as of 10:31, 30 May 2021
 | |
| Game | Super Castlevania IV |
|---|---|
| Level sections | 1-1, 1-2, 1-3 |
| Level name | Horse Stables |
| Previous level | None |
| Next level | Stage 2 |
Contents
Safe Route
A basic overview of the level if you're starting out with the game or want to know safer methods to finish the level.
Safe Strat 1-1 Video by JustDefend
Safe Strat 1-2 Video by JustDefend
Safe Strat 1-3 Video by JustDefend
Sub 40 Video Serie
Optimal Route
Sub 32 Video Serie
Note: Boost at 1:00 is not needed or "save" but you could recover since you hold up to make sure to land on stairs otherwise. Being to far off will make you boost below the top platform so I don't recommend till you are very sure about this strat.
Tutorials
1-2 Ring Wall Clip
1-2 Clip Tutorial (Joe)
Notes:
- 2 frame window (saves ~0.6sec)
1-2 Clip Tutorial (Hanage)
1-2 Clip Tutorial minimal input (bogaabogaa)
1-2 Clip Tutorial (bogaabogaa)
- Note: Left screen movement as you connect and the right frame to let go will make it successful.
1-2 Wall Clip Tutorial (by jay_cee)
Frame to let go
Pixels To Jump Into Transition
Notes:
- These are the 4 pixels where Simon can jump into the screen transition.
- This is only relevant when performing the wall clip.
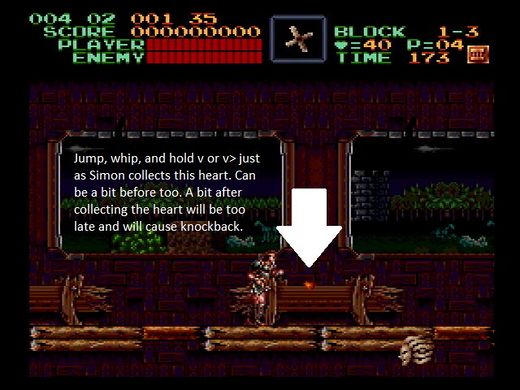
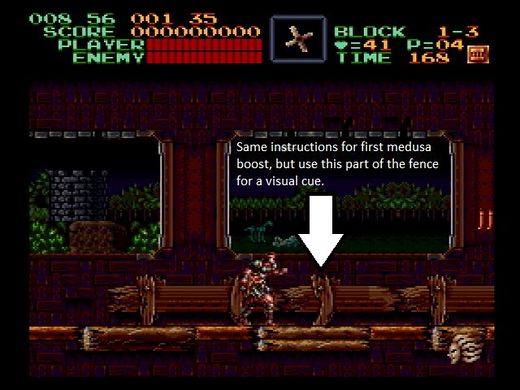
1-3 Medusa Boosts
Medusa Boost Video with Inputs
1-2 Ring-Room Full-Halfie
1-2 Ring Room Zip
Notes:
- 2 frame window. Much more difficult than wall clip, since you have to adjust during the swing to get the correct angle.
Stage 1 Route Improvement
Notes:
- This showcases an alternative bat strat
Boss Rowdin
Video with inputs
Strat compare and how much frames they save
Stair Skip (4 Frames)
1-2 Ring-Room Time Save
- This showcases the time saved from successfully executing the Ring Glitch.


